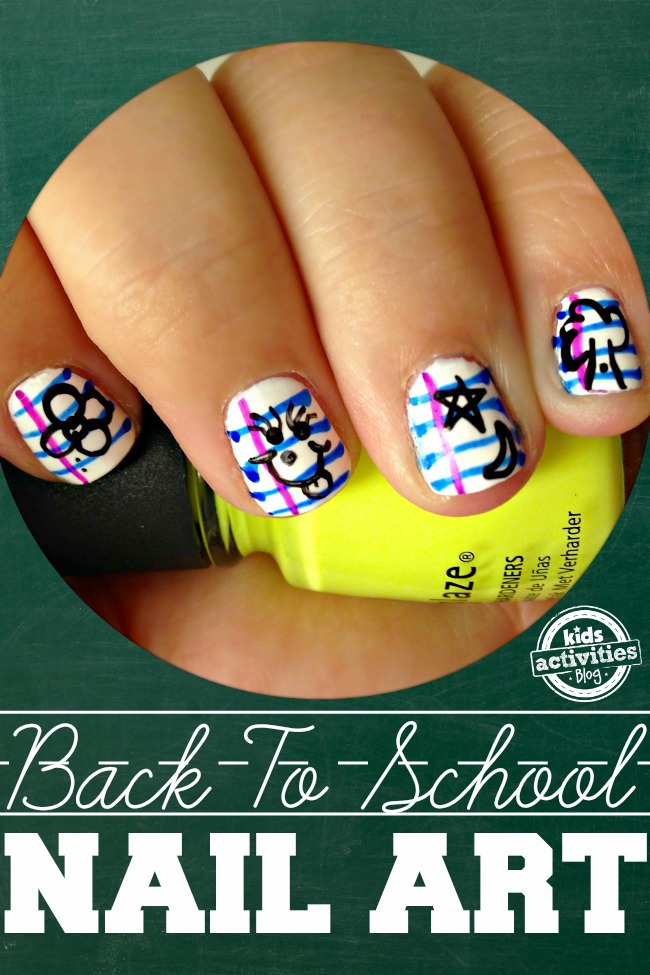
Today we are having fun with our back to school nails. You can do your own back to school manicure with a few different color markers and some white nail polish.
This notebook paper nail art is the perfect design to wear on your nails for the first day of school. I know it looks hard, but it is a SUPER easy school nail idea.

How To Create This Back to School Nail Art
A new school year deserves a new outfit and some cute nail designs. These school nail designs will remind you of one of the most basic school supplies, notebook paper!
I love this for a new school year, but it also is fun as a surprise for class presentations.
To get notebook paper back to school nails, you don’t need countless hours, fancy tools, nail art expertise or know the hottest nail trends. This even works on short nails without worry about right nail shape.
You need one color of nail polish and some permanent markers!
Basically you paint your nails white, and then draw on the rest.
This article contains affiliate links.
Supplies Needed
- White nail polish <–I recommend the OPI Alpine Snow because it covers really well in one solid coat of polish.
- Permanent markers <–I recommend the Bic Intensity Fashion Permanent Markers in Fine Point
- Fast drying top coat <–This is one of my favorite clear coat finishes
Directions
Step 1
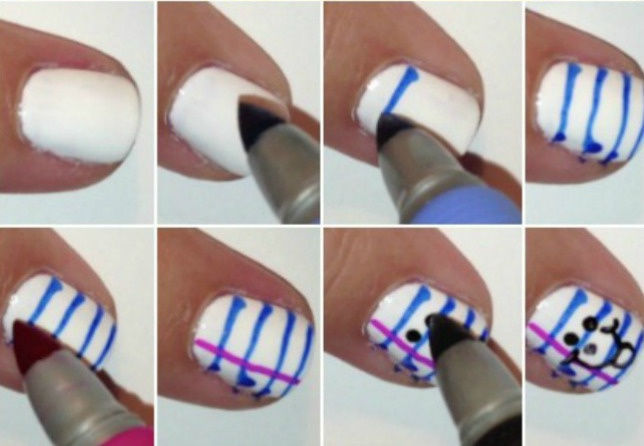
Paint your nails white. You will want to make sure your base coat of choice has full coverage over the nail and it is evenly a white solid color even if it requires multiple coats of white polish.
Step 2
Let them dry. I am talking for a while.
If they are sticky at all, then the markers won’t work.
I usually paint my daughter’s nails white and let her wear them like that for a day or so then add the design to make her manicure last longer.
Step 3
Use Bic Mark-It permanent markers to draw your first blue notebook paper line.
Step 4
Spacing them out, add additional notebook paper lines in blue across the white nail. Try to keep the ends of the lines straight and uniform so they don’t have messy edges.
Step 5
Use the pink marker to draw in the margin line down the side.
You will want to use the same side on all the nails on that hand.
Step 6
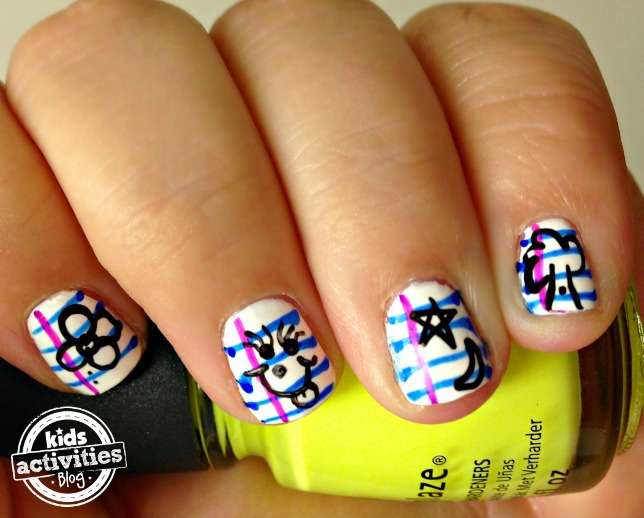
Doodle your favorite doodles on with a black marker. You don’t need a super detailed design, have some fun! Lighter markers like pastel shades don’t show up as well so use a darker color.
Step 7
Repeat this process on the rest of your nails. I tend to start with the pointer finger and then move on to the middle finger, ring finger, pinky finger and then thumb…I wonder why!
Step 8
Finish up with a fast drying top coat to seal in the drawings!
Don’t skip the fast drying top coat because it is the perfect solution to keeping your design from fading.
Removing Nail Art Designs
You can remove your fun notebook nail art after the first day of class…wait longer…with your normal nail polish remover. You can touch up around the edges with a nail polish remover soaked cotton swab and a steady hand.
Your nails will totally be awesome and amazing for back to school! I just love the way these look, and they’re super simple to do. It really is an easy look celebrating the start of the academic year.
This has become one of our school wardrobe necessities for the new year for expressing a fun sense of style!
MORE BACK TO SCHOOL FUN FROM KIDS ACTIVITIES BLOG
- Enjoy this back to school apple bookmark craft.
- Your kids will love these first day of school lunch ideas.
- Laugh out loud with these back to school jokes.
- Make the first day of school more memorable with these first day of school traditions.
- Have fun creating this school bus pictures frame to keep your children’s school year photos.
- Keep your kids crafts and memories in order with this school memory binder.
- Help your child create a daily routine with this color coded clock for kids.
Oh, and if you are looking for more nail art ideas, check out Valentines Day nails, spring nails, St Patrick’s Day nails, Halloween nail ideas, Christmas nail ideas
How did your back to school nails turn out? What other back to school nail ideas do you have? Add them in the comments below!


