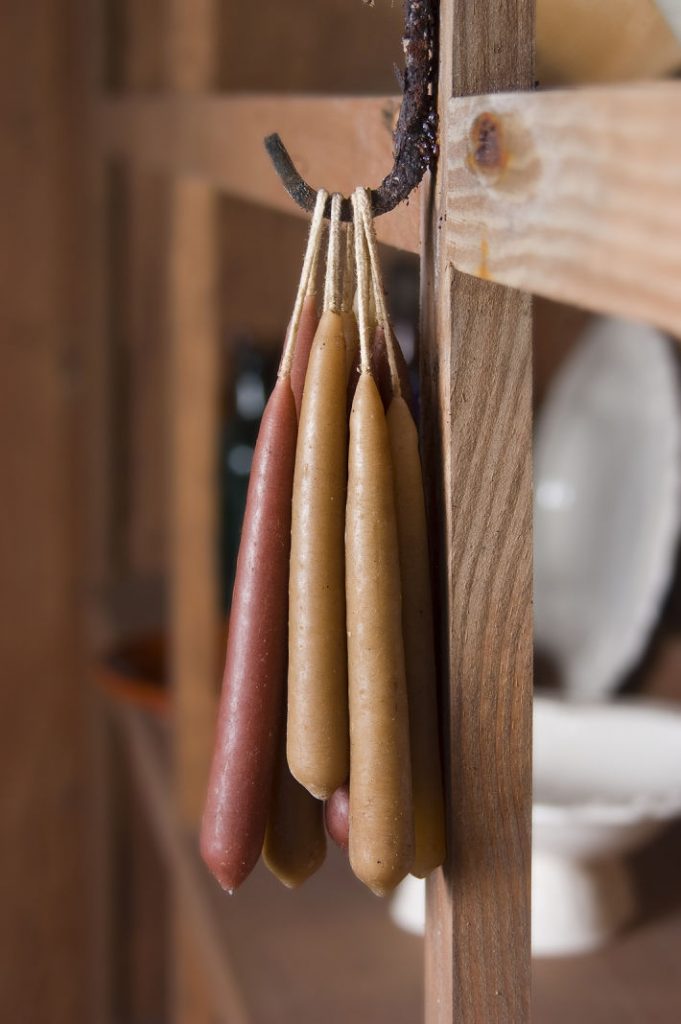
I always assumed that candle dipping (making dipped candles) was too complicated or messy to do at home. But it is easy! This year we decided to try making dipped candles together to use for our Thanksgiving table.
This is a great DIY candle making activity for kids of all ages. Obviously, the younger the child, the more supervision needed and older kids can jump in and create homemade candles in customized colors and shapes.

Candle Dipping with Kids
Add an extra special touch to your holiday table this year…dip your own candles! This is a fun project to do with kids, and they will take great pride in contributing to the holiday table.
What age is best for candle dipping? Since it involves heat/stove, adult supervision is required, but if you have a preschooler that can follow directions they can participate. Older kids can get creative in how they dip their candles and what the finished homemade candle will look like!
This article contains affiliate links.
Recycle Old Candles for Wax
You could purchase new wax at the craft store, but for this project I dug through my cabinets & pulled out old candles we don’t use any more. I happened to have green, red, & white candles that I chopped up for melting. If you only have white and you want colored candles, just throw in some old crayon bits in whatever colors you want during melting!

Candle dipping supplies you will need
- Wax – can use wax beads or old candles chopped up
- Candle wicks (purchased at craft store, costs about $2.50 for 15 ft), cut into 10″ lengths
- Empty clean large soup cans or glass jars
- Scissors
- Ruler or stick
- Hanger & clothespins
- Stove top pan
- Metal screw or something for a weight on the end of the candle wick
- (Optional) Crayons for coloring wax or candle dyes which are wax dyes for candle making
Steps to make dipped candles at home
Step 1
Recycling old candles: Chop up your wax if you’re using old candles. No need for precision here. Just cut and pare off pieces that are small enough so they can fit into the cans or jars.
Using wax beads: Fill the jar/can with wax beads.

Step 2
Place soup cans in a large sauce pot (use 1 can for each color).
If you are recycling old candle wax, fill cans 1/3 full of cool water. It seems like wax & water would not work in the cans, but the wax floats as it melts & having water in the can makes the wax melt better.
If you are using wax beads, follow the package directions, but usually no water is needed inside the jar.

Step 3
Fill sauce pan 1/2 full of water & turn heat on Low.
Add candle wax to cans, & add crayons to white wax if you are using it.
Keep heat on Low and allow wax to melt completely.
Step 4
Cover counter with plenty of newspapers.

Fill extra soup can or other disposable container with cold water (we kept a few ice cubes handy to keep the water cool).
Dipping candles is all about building layers, & you will alternate dipping your candle into the wax & cold water to set each layer.
Once your wax has completely melted, set up your dipping station.
Step 5
Fold your 10″ wick in half, so you will make two candles at one time – we found draping it over a ruler helped make the process faster.

Step 6
Add weight to the bottom end to keep the wick straight during the dipping process.
Step 7
Dip the wicks into wax, then into the can/cup of cold water.

Repeat this process many times, and continue to do so until your candles are as thick as you want them.

We found that the thinner candles burned very quickly, and the big, fat candles would last a whole meal.

Step 8
Drape the finished candle pair over a hanger & clip with a clothes pin so they stay in place or use an upper cabinet in the kitchen with something to secure the end inside.
Step 9
Allow to cool completely.
Snip the wick in half so that you now have two candles.

Suggestions for Displaying Finished Dipped Candles
Since our candles were lumpy on the bottom & uneven in size, they wouldn’t fit into candle holders. I took some votive holders & larger glass vases and filled them with brown rice. I stuck the candles into the rice & they stayed upright!

I loved this project because it’s fun for all ages, and no matter how long you dip, you will end up with functional candles! My son liked making the smaller candles, while I thought it was fun to see how thick I could make mine.
More Fun Things to Do with Kids Inspired by Making Candles at Home
- Explore candle making history in your town. If you are in the Dallas-Fort Worth area, check out all the candle dipping fun at Log Cabin Village.
- We have a huge collection of fall activities for kids that pair nicely with homemade dipped candles!
- Here are some super cute Thanksgiving craft ideas that the entire family can enjoy.
- We explore how to make wax melts for a different kind of “candle” experience.
- For jar candles, follow along to make a mod podge mason jar.
- And if dipping is a little too complicated, try candle rolling — this is good candle making activity even for the youngest crafters.
How did making your own candles turn out? Where you surprised to see how fun and easy it was to make candles at home?


